
Marble nails look expensive and stay calm. Soft veining, a clean base, nothing loud — yet no two nails ever match, and that is the point. This guide pairs 25 designs worth copying with the three methods that create them, so you can pick a look and know exactly how to make it.
Start with the method, not the colour. Water marble gives bold swirls. Dry marble gives fine, controlled veins. Gel blooming gives the soft, stone-like blur of salon photos. Once you know the effect, the design choice is simple.
Below: a quick verdict, comparison tables, the 25 designs in nine families, full instructions for all three methods, and the mistakes that ruin marble — so you can skip them.
Quick Answer: Marble nails copy the veining of real stone using polish or gel. The easiest route at home is dry marble: paint a wet base, dot on a second colour and drag a toothpick through it before it dries. For soft salon-style stone, use blooming gel and cure it. For bold swirls, use water marble. Seal every method with top coat.
Jump to: The Verdict | 25 Marble Nail Designs | 3 DIY Methods | Colors & Techniques Compared | How to Choose | FAQs
The Verdict: Which Marble Method Should You Pick?
Best for beginners: dry marble. No cup of water, no lamp, no cleanup. You work on one wet nail at a time, and a mistake wipes off before top coat. Best salon look: gel blooming. The gel spreads the colour for you, creating the cloudy stone blur brushes cannot copy. Fastest full set: dry marble, roughly two minutes per nail. Boldest result: water marble — dramatic, but the messiest and least predictable. Choose by effect first, effort second.
Marble Nail Colors & Techniques Compared
| Technique | Difficulty | What You Need | Best For | Look |
|---|---|---|---|---|
| Water marble | Hard | Cup, room-temperature water, 2–3 polishes, toothpick, tape or liquid latex | Bold, playful sets | Swirled, psychedelic patterns |
| Dry marble (drag marble) | Easy | Base polish, 1–2 vein colours, toothpick or fine brush | Beginners, fine veining | Thin, realistic stone veins |
| Gel blooming | Medium | Blooming gel, gel colours, UV/LED lamp, liner brush | Soft salon stone effects | Cloudy, blurred, natural marble |
| Marble stickers / foils | Easiest | Marble nail stickers or foil, base colour, top coat | Zero-skill, last-minute sets | Flat, printed marble pattern |
| Colorway | Finish | Best Season |
|---|---|---|
| White & gold | Glossy + gold foil veins | All year, weddings |
| Black marble | Glossy, white/silver veins | Autumn–winter, evenings |
| Pink rose quartz | Glossy, sheer blush base | Spring, everyday soft glam |
| Blue agate | Glossy, deep layered swirls | Summer, holidays |
| Green marble | Glossy, gold accents | Autumn–winter, festive sets |
25 Marble Nail Designs to Copy
Twenty-five designs, nine families. Each family names the method that creates it best, so the gallery and the tutorial stay connected.
1–3. Classic White & Gold Marble
The original. A milky white base, hair-thin grey veins and one line of gold foil where a vein would naturally run. Keep veins sparse — real Carrara marble is mostly empty space. Variants: pure white and grey for an office-safe set, white with gold foil for weddings, and a milky sheer base over a pink nail bed for soft quartz. Dry marble gives the sharpest veins.

4–6. Black Marble
Black marble reverses the contrast: a deep base, fine white veins, total restraint. Variants: classic black and white on almond nails, black with silver veins for evening, and black with a single garnet-red swirl for a moodier set. One rule — veins stay thin, or the nail reads as cracked, not stone.

7–9. Grey & Quartz Marble
The quietest family. Soft grey, fog white and a whisper of silver create a cool, architectural finish that suits short nails best. Variants: light grey quartz on oval nails, a grey-and-white ombré marble fading toward the tip, and matte grey marble — the only family where matte improves the stone illusion.

10–12. Pink & Rose Quartz Marble
Rose quartz is marble softened: a sheer blush base, cloudy white fractures and a flake of gold foil at the cuticle. Variants: classic rose quartz on almond nails, milky pink quartz for a glazed finish, and pink marble French tips — marble kept only on the tip. Blooming gel was made for this family; the blur is the whole effect.
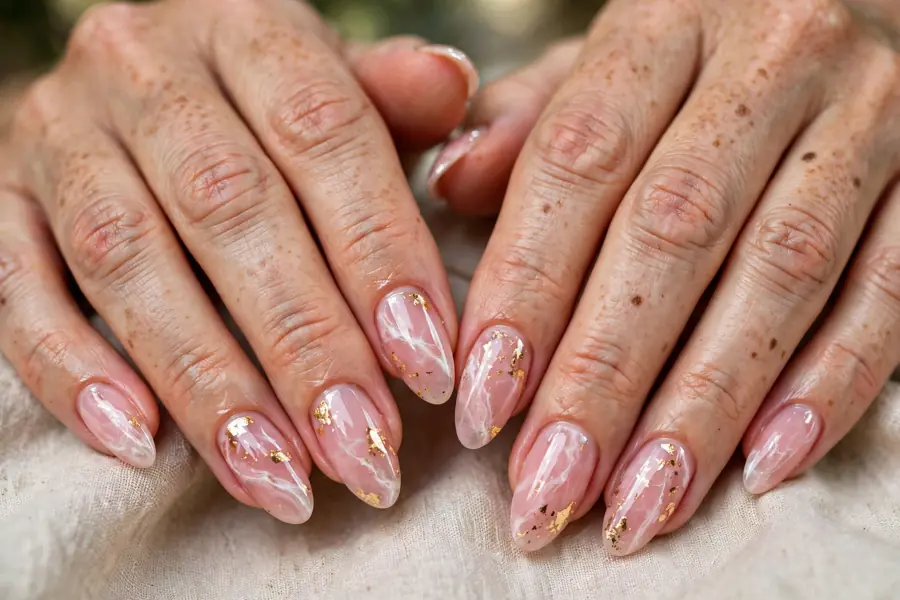
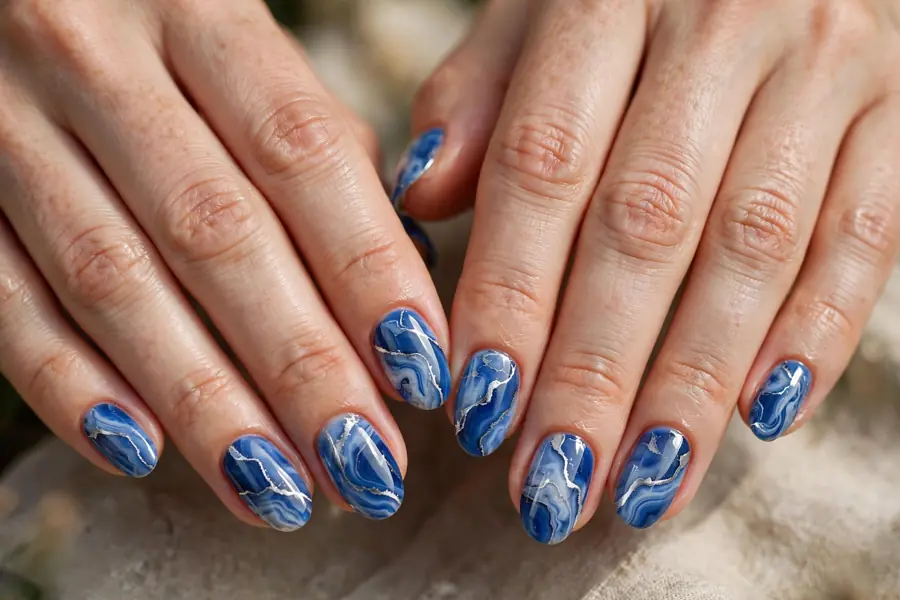
13–15. Blue & Agate Marble
Blue marble borrows from agate: layered bands of navy, sky and white, edged with silver. Variants: deep blue agate on longer nails where the bands have room, pale blue and white marble for summer, and turquoise stone with gold edges. Water marble earns its place here — its swirl is the closest home match to agate banding.
16–18. Green Marble
Emerald, jade and malachite tones make green the richest family. Variants: deep emerald with white veins and gold accents, soft sage-green marble for spring, and dark green on coffin nails for festive sets. Keep gold minimal — one foil fleck per nail. Green pigments stain, so base coat is not optional.

19–21. Pastel Marble
Pastel marble mixes two or three soft shades — lavender, blush, powder blue — under white veining. Variants: rainbow pastel with a different shade per nail, two-tone pink and lavender, and pastel over white for the lightest spring finish. Dry marble suits pastels best; water marble can muddy shades this pale. Drag once, not three times.

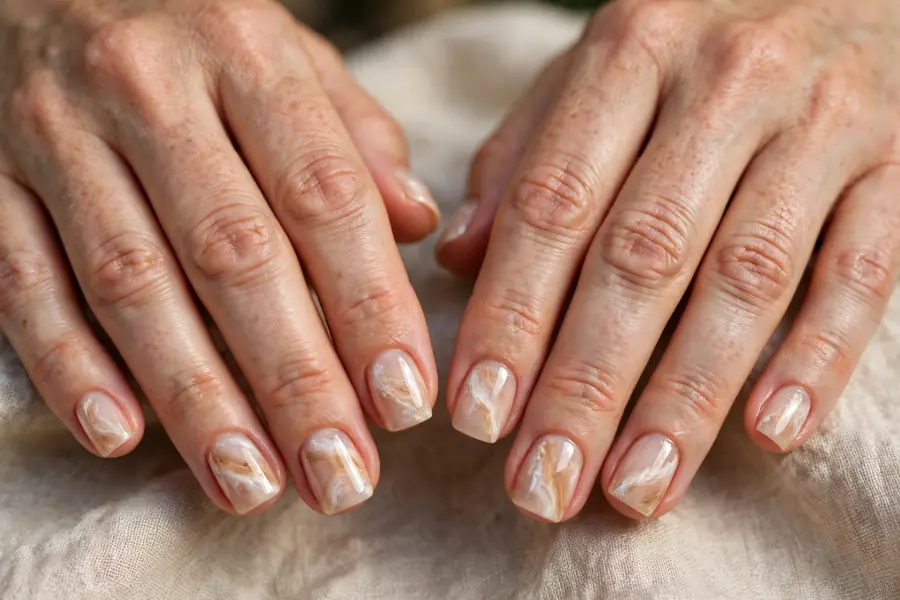
22–23. Nude & Coffee Marble
A sheer nude or warm beige base with soft white and tan swirls — marble at its most wearable. Variants: nude marble on short square nails for everyday, and coffee swirls — feathered brown veins over cream for an autumn version with more depth. Low contrast forgives shaky veins. This is the best first marble you will ever do.
24–25. Gemstone Marble
The statement end: amethyst purple with white fractures and silver foil, or a jewel marble mixing emerald, sapphire and gold. Variants: amethyst on almond nails, and a mixed gemstone set — one stone per hand, kept glossy so colours read as polished rock. Save these for longer nails and evenings.

How to Do Marble Nails at Home: 3 Easy Methods
Method 1: Water Marble
Supplies: small cup, room-temperature distilled water, base coat, white polish, 2 vein colours, toothpick, tape or liquid latex, cotton swabs, remover, top coat.
- Apply base coat, then 2–3 coats of white polish. Let it dry fully.
- Protect the skin around each nail with tape or liquid latex.
- Fill the cup with room-temperature water. This step decides everything — cold water makes polish sink or seize.
- Drop one drop of polish onto the water. It should spread into a circle. Add drops of alternating colour into the centre, building 5–8 rings.
- Drag a toothpick lightly through the rings to pull the pattern into veins and swirls.
- Dip one nail at a 45-degree angle, directly over the part of the pattern you want.
- While the finger stays submerged, clear the remaining surface polish with the toothpick so it cannot fold onto the nail.
- Lift out slowly, remove the tape, clean edges with a swab, and repeat for each nail. Seal with top coat once dry.
Pro tips: work quickly, and test a new polish on one nail first — some formulas refuse to spread.
Common mistakes: cold water, dropping from too high, and over-dragging until colours turn to mud.
Method 2: Dry Marble (Drag Marble)
Supplies: base coat, base colour, 1–2 vein colours, toothpick or fine liner brush, top coat. No water, no lamp.
- Apply base coat and one coat of your base colour. Do not let the second coat dry.
- While the second coat is wet, dot small drops of the vein colour along one side of the nail.
- Drag the toothpick through the drops in a loose S or zigzag, pulling the colour into thin veins.
- Add one finer vein with the brush tip if you want depth. Stop early — marble needs empty space.
- Repeat nail by nail, working on wet polish each time. Let it dry fully, then seal with top coat.
Pro tips: a sheer base makes veins look embedded in stone, and grey — not black — makes the most realistic first vein.
Common mistakes: letting the base dry before dragging, and adding too many veins.
Method 3: Gel Blooming
Supplies: gel base and top coat, gel colour, clear blooming gel, liner brush or dotting tool, UV/LED lamp.
- Prep, apply gel base coat and cure — 60 seconds under LED, up to 2 minutes under UV.
- Apply your gel colour and cure fully.
- Apply a thin layer of blooming gel over the whole nail. Do not cure it.
- Dot or line your vein colours into the wet blooming gel with the liner brush. Watch them spread and soften on their own.
- When the blur looks right — usually under a minute — cure for 60 seconds under LED.
- Add one sharp fine vein with the liner brush if you want contrast, cure again briefly, then seal with gel top coat and cure.
Pro tips: less colour blooms better; contrasting colours bloom most visibly.
Common mistakes: curing the blooming gel before adding colour (nothing spreads), and using too thick a layer (the pattern floods).
How to Choose Your Marble Nails
By skill level: first time, dry marble or stickers. Comfortable with gel, blooming. Patient, water marble. By length and shape: short square nails suit nude, grey and pastel with fine veins; almond and coffin carry agate, gemstone and bold swirls. By occasion: white and gold or rose quartz for weddings, nude and grey for work, black and green for evenings. By maintenance: polish marble lasts 5–7 days; gel blooming, properly cured and sealed, lasts 2–3 weeks or more.
More Nail Ideas You’ll Love
Frequently Asked Questions
How do you do marble nails at home?
The simplest way is dry marble: paint a base colour, and while the second coat is still wet, dot on a vein colour and drag a toothpick through it to form thin veins. Let it dry and seal with top coat. Gel blooming gives a softer salon finish, and water marble gives the boldest swirls.
What supplies do you need for water marble nails?
You need a small cup of room-temperature water, a base coat, a white or light base polish, two or more colours that spread well, a toothpick or orange stick, tape or liquid latex to protect your skin, cotton swabs with remover for cleanup, and a top coat to seal the design.
How long do marble nails last?
With regular polish, expect about 5–7 days before edges wear. Gel marble — including blooming gel that is properly cured and sealed with top coat — typically lasts 2–3 weeks, and blooming gel products claim 28 days or more with careful prep. Press-on marble sets usually last 1–2 weeks.
Can you do marble nails without white polish?
Yes. White is only the classic base, not a requirement. Nude, sheer pink, light grey and beige bases all marble well, and they suit rose quartz, nude and coffee designs better than white does. Apply base coat, use your alternative base colour, let it set as the method requires, then add your veins.
Why does my polish sink or refuse to spread in water marble?
The water is almost always the problem. Water that is too cold makes polish sink or skin over; too warm makes it dry before you can drag it. Use room-temperature, ideally distilled, water, drop the polish from just above the surface, and if one brand still refuses to spread, switch that colour — some formulas simply do not water-marble.
Final Thoughts
Marble rewards restraint. Pick one method, one colour family and keep the veins thin and few. Start with dry marble in nude or white and gold, and the stone effect will arrive faster than you expect. Clean, precise, uncluttered — that is marble at its best, and it is entirely doable at your own table.